Turntable feet are responsible for isolation from feedback and levelling the turntable to ensure that this precision device works without any issue.
Levelling your Turntable Feet
Isolation is a modern-day problem for record enthusiasts. Old school record-players had a heavy base or otherwise tall legs. That’s right, record-players or as they were earlier called, Gramophones, were mostly self-standing pieces of furniture. Additionally, inbuilt speakers made them compact. These speakers were not absolutely precise but still provided a pleasant and warm sound.
All the cracks and pops of the record added to the wonderful experience of music on records. Isolation was not really an important factor.
Advancements in technology and in parts of the music industry gave rise to better record players and creation of the modern turntable.

The modern Turntable: A more compact, tabletop, precision music-playing device with external speakers.
Advancement in various industries from metal works to electricity helped improve the turntable.
- Old Needles were replaced by thinner more durable and better needles. Later the diamond-tipped ones as used today added to precision sound quality.
- Records evolved as well, the lightweight Vinyl records of today were once bulky brittle old school Graphite.
- Mechanics of the device changed as electric motors replaced the hand crank.
- Advancement in electrical circuits and technology including Speaker design allowed for better output and more control.
All the advancement in technology improved the quality of sound but also brought about a major problem, that still hounds vinyl enthusiasts: FEEDBACK!
Ever experienced feedback?
Have you ever heard the screeching, pulsating sound made by audio speakers? This happens when someone is talking on a microphone too close to it. It is very unpleasant and at times unbearable. A similar thing happens with your turntable.
Turntable feedback is a DJ’s worst nightmare during a performance. Deal with it before the performance, as part of the sound check.
What is Feedback?
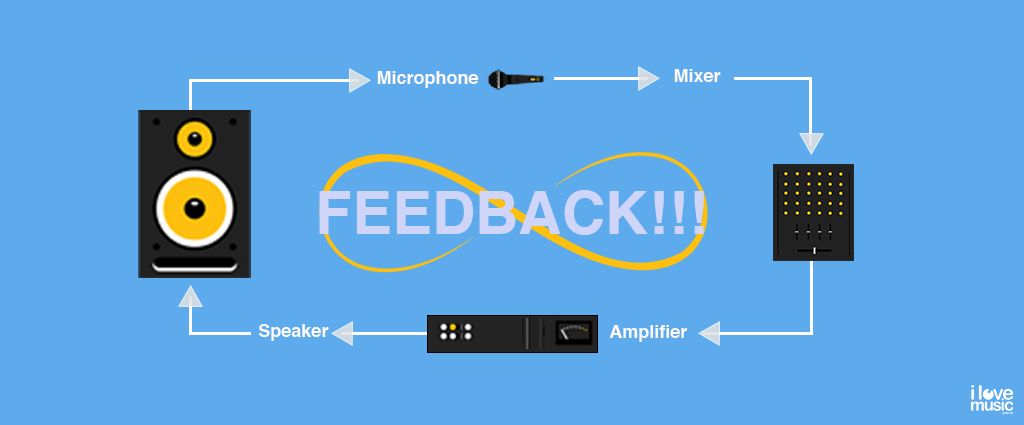
Feedback occurs when the sound coming out of a speaker is fed back into it through the microphone. This continues to amplify the sound into itself. A loop is created that quickly turns into that classic loud howling or screeching sound.
What causes feedback in Turntables?
The two main issues are Placement & Isolation.
Placement refers to the position or placement of the Turntable and its proximity to the Speakers. Here is a simple solution. Change the direction of the speaker. Or reposition the speaker or the turntable by a few inches. A simple trial and error process can help fix the issue.
Isolation, “It is not such an easy fix“. Vibrations move upwards from the surface on which the turntable is placed. Hence, the feet of the turntable is designed to take care of isolation. It protects the body and stylus of the turntable from any external vibrations. The stylus is like a microphone and pickups all vibration including external vibrations representing itself as an audible hum. The stylus jumped out of the groove off the record. Lack of isolation caused it. It leads to disruption of the performance and in a more extreme instant, damages the stylus & the record.
Some feet have a spring suspension system that helps in isolation. Most midrange turntables do not handle heavy bass and sub-bass hits well. Therefore, additional isolation or bracing is required.
“Feedback is unacceptable during a performance!”
A number of DIY tactics are applied to achieve isolation. From Isolation boards to fancy feet, to concrete slabs with rubber/squash balls. A great article with a practical understanding of the same is a DJ’s guide to isolation found on RA: < residentadvisor.net/isolation-guide.pdf >
A must-read for all professional DJ turntablists and promoter/event organisers employing them.
PRO TIPS for home use:
- Position the Speakers and Turntables on separate surfaces so that speaker vibrations don’t reach the turntable.
- Level the surface of the turntable
- Isolate the turntable from any outside interference and other electronic equipment
- Always keep your turntables in a clean, dust-free environment indoors.
The modern DJ turntable is mostly a replication and/or adaptation of the old school Technics 1200 series. More and more technological advancements for precision sound are adapted into the turntable design. Not necessarily a good thing. It makes them more delicate, sensitive, however precise. As modern dance music gets more bass-heavy the need for better legs and more isolation is more evident.
Turntable Feet
The feet of the turntable comprises of the 4 pegs screwed into the bottom of the turntable that is responsible for keeping the turntable body off the surface on which it rests, primarily for the purpose of structural isolation.
Levelling:

One of the most ignored aspects of turntable set-up is levelling. The turntable requires an even surface to function properly and is very sensitive, one can even go to the extent of saying it is a precision instrument and will not function properly unless levelled
What can happen if your turntables are not levelled?
If you do not level your turntables before using them, you can face the following problems:
- The stylus can skip off the vinyl groove
- Problems in anti-skating, pulling too far in one direction
- Instability in belt drive turntables causing hums and add-on vibrations
- Pitch instability
- Needle eating too deep into the vinyl and destroying the sound over time.
All of the above are real-world issues faced because of uneven levelling. But the solution is quite simple and mostly inexpensive.
In fact, all it will cost you is time!
The feet of most turntables are adjustable. Simply screwed or unscrewed to adjust the level.
Steps to Level your Turntable.
Total Time: 2 minutes
Place turntable on a flat surface
Ensure that the surface you place your turntable is not wobbly and on a flat surface.

Use a Bubble level indicator
Use a bubble level indicator, place it on the platter to determine the correct level.

Screw or unscrew
Simply screw or unscrew the turntable feet to adjust the level.
Check the bubble indicator
When the bubble indicator is at the center you have levelled your turntable feet correctly.

For more information about turntables and it’s part refer: Turntables- the breakdown


