We have all heard the term and know of its notorious deed of making audio sound bad, but do we really understand what it is? Audio Clipping is commonly referred to or associated with red-lining. Let’s take a Dive into the dreaded “Audio Clipping”.
Every machine has a limit, if you try to push it beyond the limit it can fail. Audio clipping is a kind of failure, not caused due to a machine fault but rather a user fault. Audio Clipping occurs when you overdrive audio equipment beyond its intended capacity. For one to understand what Audio clipping actually is, one would need to understand the “Sine Wave”.
Sine Wave

Considered as the building blocks of sound, Sine wave is the purest form that represents sound. It is the way we represent audio as a mathematical graph. In essence, it describes the smooth periodic oscillation of constant amplitude.
Sound does not actually move in the form of a wave, it spreads in all directions evenly if not obstructed, as an oscillation of air pressure and normally looses intensity the further it moves away from the source. However, this is impossible to draw. Therefore, represented as a Sine wave in 2 dimensions via the graph; taking into consideration distance, time and intensity.
The Graphical representation below will help you visually understand the Sine wave form.
The Sine wave has 3 main characteristics:
Frequency:
the number of times the wave occurs. The rate of repetition of a wave, measured in cycles per second. Called Hertz or (Hz).
Note: Frequency and wavelength are inversely proportional. Lower the frequency larger the wavelength. (λ =1/f)
Amplitude:
is the loudness or softness of a sound. It is the pressure of sound, measured in Decibels (dB). The height of each wave from 0db defining the Amplitude.
Phase:
An angular measurement of the time difference between two similar waveforms (expressed in degrees).
See the sine wave this is what we want for our sound output, a smooth and clean flow. Here the signal is undisturbed and indicators on the metering units of the audio equipment such as a mixer would be in the green or amber zone.
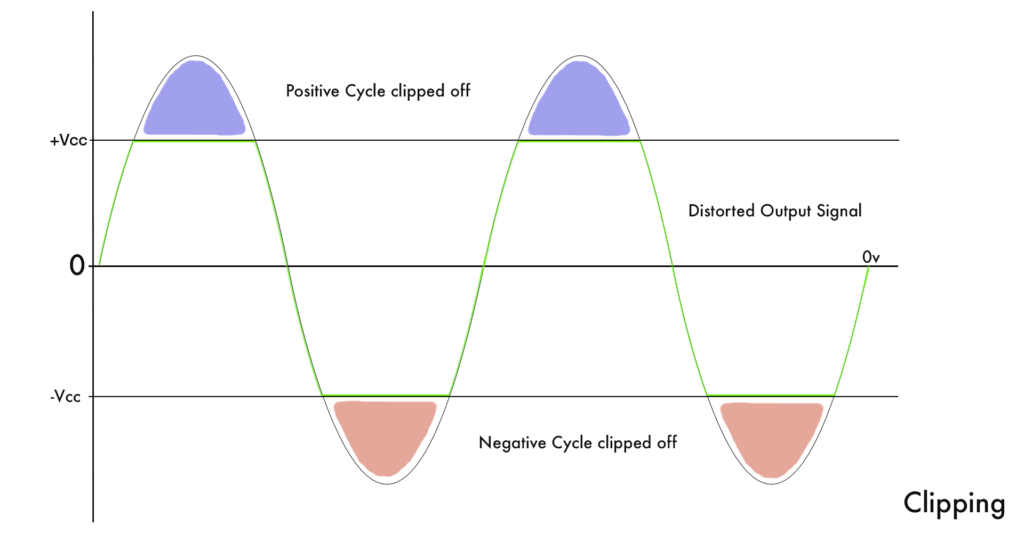
Now if one is to start to overdrive the signal or in layman’s terms increase the amplification to a point the equipment can no longer handle the output, then the indicators on a mixer would start to touch red and that is when clipping occurs.
Audio clipping
Audio Clipping is basically a form of distortion of the waveform. It occurs when an amplifier is pushed beyond its maximum limit, causing the signal to get distorted. Here the drivers are pushed to produce an output voltage beyond their capability. The result is a noisy and unpleasant output.
The sine wave here is cut-off from the top and bottom or “clipped”, resulting in sound distortion and a squared off waveform. This can occur in two ways: Hard & Soft Clipping.
Hard clipping:
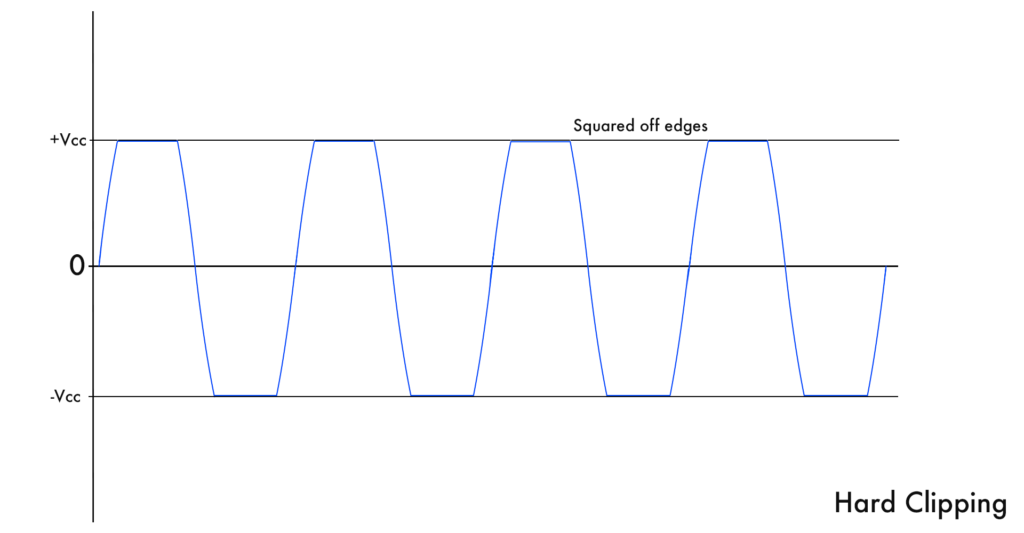
Hard clipping squares off the wave completely. Causes more loudness but adds harmonics and most noise or distortion in the sound. It also causes a loss of bass. Digital clipping is Hard clipping. Most digital equipment has digital limiters that cause this kind of hard clipping. Often an analogy of “hitting a brick wall” is associated with this kind of clipping.
Soft Clipping:

Also referred to as analogue clipping as it occurs mainly in older analogue gear, where enough headroom allows for smoother sound with less distortion. Here you see the Edges of the clipped waveform rounded off. It gives a smoother, better sound for easier listening. It is less damaging to high-frequency drivers.
Common occurrences of Audio Clipping
All Clipping is not bad. If it sounds bad then of course it is, but if used in the right way it can also sound good. Over-driving one’s equipment is never a good idea, and will definitely eat into the life of your equipment, but do it correctly and it will give you the desired outcome that can be considered good for your audio listening experience.
Recording Industry and the Loudness war.
While recording, clipping is used as an effective way to increase the loudness of Audio. Since the advent of CD’s the recording industry has been increasing the master levels of audio using clipping & compression to make the average loudness of audio even louder. Referred to as the loudness war; where through the ages, music has been getting louder and louder. This results in overdriving audio equipment to result in forced clipping in extreme cases. The Loudness war peaked in 2005 and since then normalisation of music and comfortable loudness has been pushed especially through online music distribution platforms.
Distortion on a guitar
Distortion on an Electric guitar is caused by overdriving the inbuilt amplifier to add harmonics and give a distorted effect. This intentional overdrive in the guitar amplifier in order to get the desired sound is a perfect example of audio clipping used in a good way.
Redlining on a mixer
Increase the output of the mixer to a point causing the indicators to move out of the green and amber zone, into the red. Redlining adds noise & distortion caused due to clipping. It is never good to overdrive the inbuilt pickups or amps in a mixer, especially newer digital ones as this would result in hard clipping.
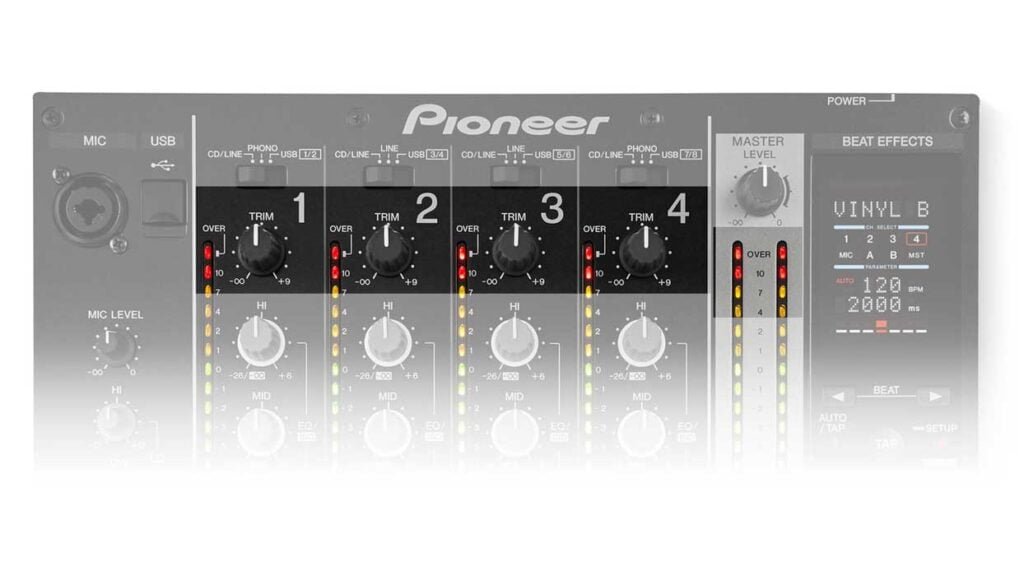
In a mixer, apart from channel fader controlling the levels of input into each channel, each channel has Hi’s Mid’s and Lo end level controls apart from a channel gain, which controls the overall loudness of the audio output of the channel. Additionally, there is also a master gain which controls the total output of the mixer. This way the mixer has multiple levels of control to adjust audio input and output and avoid clipping.
When DJ’s Redline.
All songs are not mastered at the same level. Often, Dj’s increase the levels of the softer track to match the louder track. Don’t! Keep audio levels in the green, control the channel gain, avoid redlining any one channel. Rather than increasing to the louder, reduce the louder and match the channel gain to the softer. Increase the master gain if required to check levels of the PA. As more crowd comes in don’t drive volumes higher; it is unpleasant for the audience. Keep in check the levels on the dancefloor. The Dj can do this by the DJ stepping off the console for a few seconds to check the actual level or loudness on the dance floor. See people shouting to communicate with each other at a fair distance from the speaker? Check the levels.
Some DJ’s use audio clipping for loudness when they don’t have control over the main PA. They want it loud and overdrive the system. Be careful to avoid the distortion caused by audio clipping, it is unpleasant for the listening audience. Dj’s are careful to get the best quality music, ensuring the audience experiences the full range of the pre-recorded tracks. This is lost with audio clipping.
You can find out more about Red Lining and other precautions that DJ’s must take while DJ-ing here: Things that don’t need to be said, but we are saying them anyways
Clipping can occur at any stage of audio, be it in its creation or delivery.
- A simple way to avoid clipping is to constantly check levels and provide headroom while recording or creating music, especially during the mixing and mastering.
- Make corrections and use compression effectively during the production stage rather than clipping to drive loudness during a performance.
- Use quality gear and identify the points where signals peak to avoid distortion.
- Come to an understanding with artists performing, be it bands or Dj’s to clear the air, decide on levels and ensure that the audience has a great experience without any room for audio clipping.


